Friday, November 22, 2013

A Family Advent Tree

16,000 woodworking plans inside...(2 days left) 

I just discovered this and suggest you see this immediately... 

BHC 14 INEXPENSIVE TREE STAND PDF Plans build your own tree stand Woodworking Download.

Click Here To Download

Every year, the holiday season screams past.  School parties, work socials, family Christmases...the calendar gets so full, so quickly.  This year, Brent and I were determined to slow things down.  Our calendar has been cleared of all non-essential activities, all that remains are church activities and work functions.  We want the month of December to be all about our little family and truly enjoying the season.  Emma and Owen are at that special age where Christmas is still so full of anticipation and magic...we want to capitalize on that to ensure the holidays are filled with memories for them.

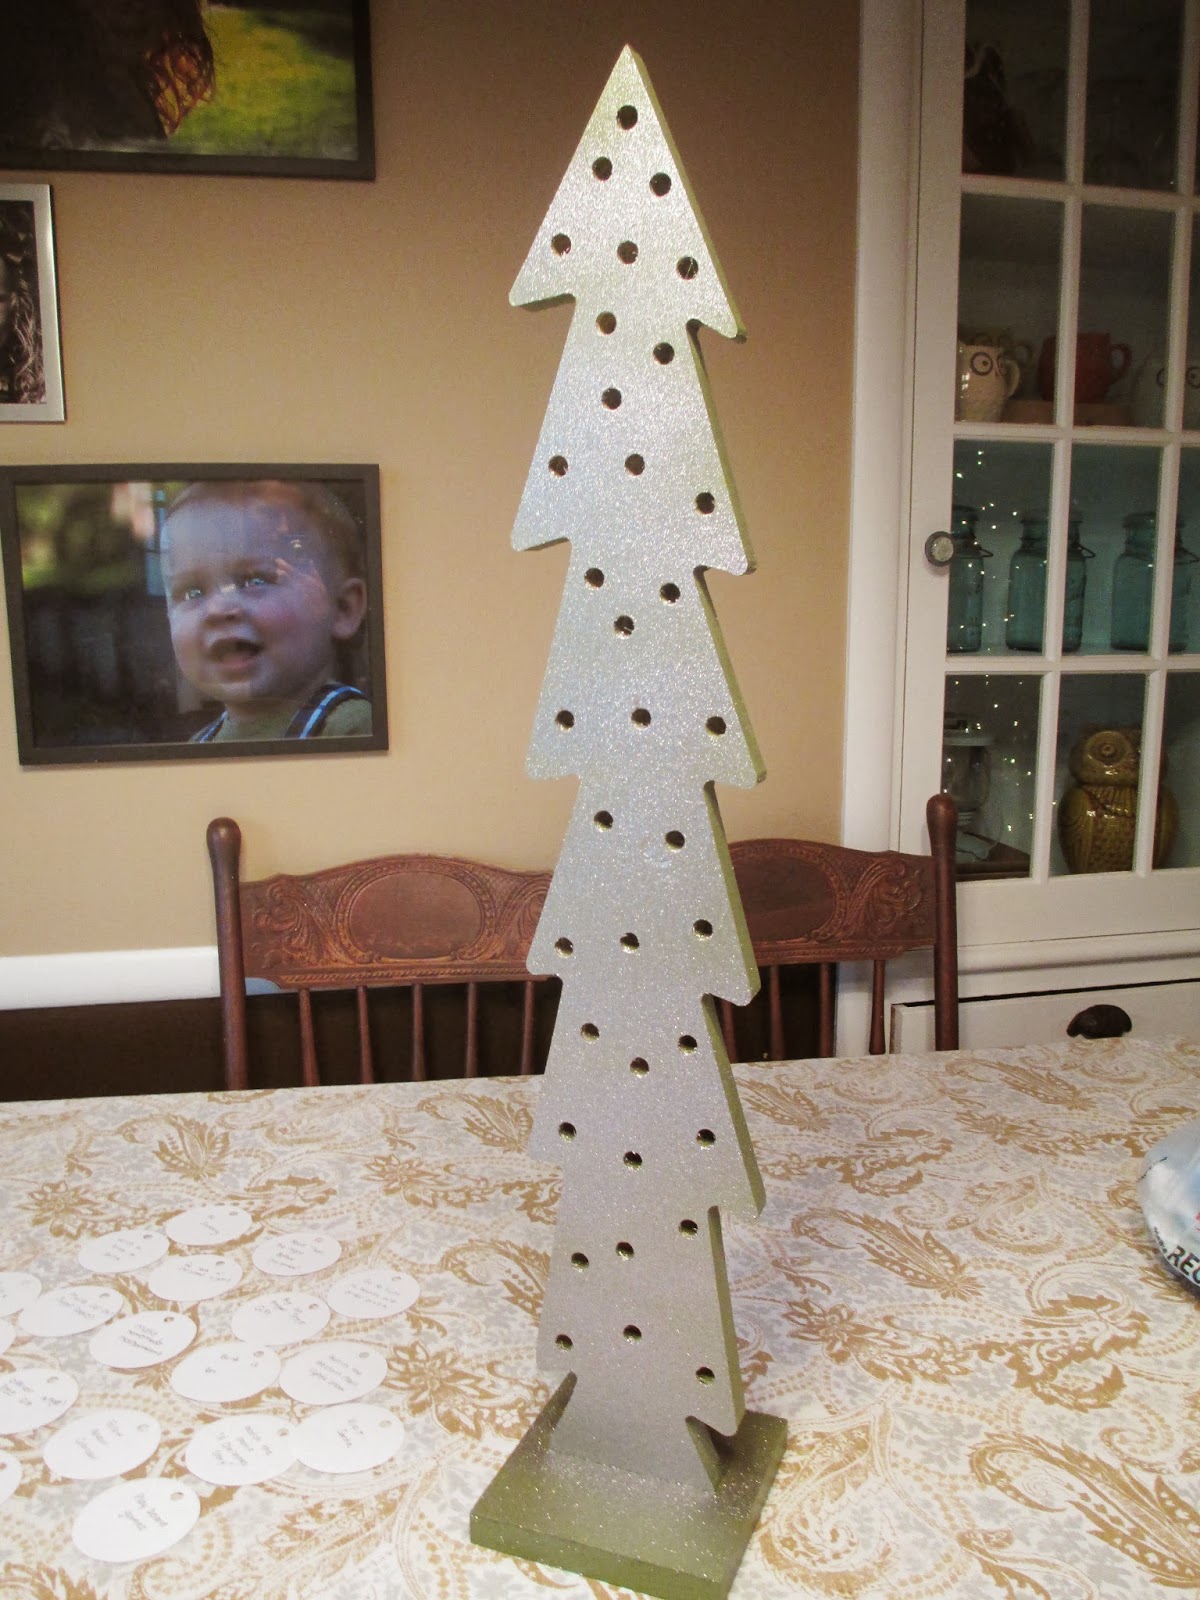
I kept going back to something I had read on Pinterest.  It was a little diddy that said something simple..."Experiences rather than Things."  My mind began to churn out Christmas season "experiences" that I thought the kids would enjoy.  Then, as luck would have it, I was working my way through Hobby Lobby and I spotted this tree.


I thought it would be perfect to hang our "experiences" on.  As another bolt of lightning struck me, I figured if I came up with 24 "experiences", it would technically be an Advent Tree.  Figuring out 24 things wasn't as simple as I had hoped.  Some were easy and obvious, others took some extra thought and google-ing.  Emma and Owen gave us their ideas of what they would like to do as well.  A kids idea of fun is usually much simpler and easier that what an adults idea of fun is.  Their main requests were to order a pizza and play games.

Even though we could have easily done this project without actually purchasing any supplies, I decided to splurge and spend $20 to have a little fun.  The tree was half price for $8, paint was about $9 and the 2 pieces of scrapbook paper were $.50.

We didn't have any green paint for the tree, so we picked up a test pot of from Lowe's.  At the same time, we got a can of spray glitter.  As we were approaching the checkout - I had an episode of pre-buyer's remorse - and asked Brent if we needed the paint and glitter, as we could use some sort of paint from home.  Brent then said some of the most beautiful words he has ever spoken...he said, "I don't care if we get the green paint, but I definitely want to get the glitter because all that glitters is gold."  My husband wanted glitter and I wasn't about to deny him.


Putting the Advent Tree together was easy.  Emma and Owen painted it, using a Q-tip to get into the tiny holes.


This is after 2 coats.


I used the two pieces of scrapbook paper and traced 24 circles out - then cut out each one.  Emma and I used a three hole punch to put a hole through each ornament  Writing out the tags was Emma's favorite part - too bad she got bored of it after 4 of them.


Meanwhile, Brent was hitting the tree with a healthy coat of glitter.  I lied, Brent lightly dusted it with glitter...it wasn't enough, so I snatched the can from him and went a little crazy on it, all while yelling "MORE GLITTER!"  The looks on little Emma and Owen's faces told me I had taken it too far.  I guess less is more when it comes to glitter.


Kind of hard to tell the tree was originally green under all that glitter.  Yeah, my fault.


You are probably smart enough to figure out how to attach paper circles to a tree, but for those of you that don't have the mental energy to figure it out or maybe you are just bored and don't care how long I babble on and on about wood trees...I used a scissor and leftover ribbon.


Thankfully the tree already had holes in it because you are supposed to poke Christmas lights thru from the back.  I just threaded my ribbon through.  That step seems easy, but you try working around a three foot tall slab of wood while trying to thread tiny ribbon through even tinier holes all while two little kids are hovering, bumping and nosing around.  


And a quick little tie in the back keeps it from slipping through.


After some focused effort, we had tied all of the ornaments on.  And the results were NOT IMPRESSIVE.  My ornaments were so large that you couldn't see the tree anymore!  


See what I mean..  Where the heck did the tree go?  Fail.  


So we cut the ornaments loose and trimmed them down.   Looks better now.


Below is a list of the experiences we came up with.  We tried to think of things that we could all do together as a family.  Many of them we would have done, regardless of the Advent Tree, but we thought if we wrote them down and tried to tackle each one with intention, it would feel more special.

1.  Read daily Advent verses - I found a website listing an applicable Bible verse to read each day of    Advent which is located here.
2.  Watch a family holiday movie with popcorn and treats - this is Emma & Owen's favorite activity to do with us.
3.  Buy an Angel Tree gift
4.  Write a letter to Santa
5.  Deliver Angel Tree gifts - Brent is on the church committee in charge of this one
6.  Put together a new puzzle
7.  Go to Xcite to bounce and then order pizza - this was Emma's suggestion
8.  Visit a living Nativity - anybody know of one that is planned???
9.  Drive around to admire Christmas lights - Dec 22nd is the Park Ridge Luminaries
10.  Build a snowman - weather permitting
11.  Wrap Christmas gifts
12.  Work on the chocolate Advent calendars from Grandma Jo
13.  Build an awesome indoor fort
14.  Make cut-out sugar cookies and decorate them
15.  Make a birthday card for Jesus - to remind the kids that Christmas isn't just about Santa
16.  Visit Santa
17.  Make puppy chow - this was Brent's request
18.  Read "Twas The Night Before Christmas"
19.  Watch the Western Mall light show
20.  Make teacher gifts
21.  Watch the movie "A Christmas Story" - somehow I've never seen this!
22.  Family board game night
23.  Make homemade marshmallows - we're hoping to do this Christmas Eve
24.  Go sledding - again, weather permitting

We know that we won't necessarily be able to do one of these each day like you would with a traditional Advent calendar.  Our intent is to do the best we can to cross each of these things off the list prior to Christmas.  With our weekends freed up, we should be able to squeeze 3 or 4 things in over the course of two days.  What sort of holiday traditions are you hoping to squeeze in?

Monday, November 18, 2013

DEFCON 1

16,000 woodworking plans inside...(2 days left) 

I just discovered this and suggest you see this immediately... 

BHC 14 INEXPENSIVE TREE STAND PDF Plans build your own tree stand Woodworking Download.
Click Here To Download


Brent says I hit DEFCON 5 when I find out someone is coming to our house - because typically our house is in a state of complete disaster.  I had to wiki what DEFCON 5 meant.  It is a readiness level the military uses when determining what state of alertness to be in - level 5 is actually the lowest level, so he should probably start putting me at level 3.

We are a busy family that prefers to be outdoors when the weather cooperates rather than scrubbing floors, dusting and Windexing.  When I find out visitors are on the horizon, I go into a tailspin of cleaning fury...whilst commanding orders to the remainder of the family unit.  Adrenaline runs like wine during these instances, but it works because things usually look pretty put together by the time said visitor steps through our front door.  If you've been to our house and thought "hmmmm...I wonder how they keep it looking like this!" The secret is that we don't.  Just ask my mom.

So when the Argus Leader contacted us recently to do a story about Brent and I that would involve interviews, pictures and a video, we officially freaked out.  Well, I freaked out, Brent just stood back and watched while I went through my roller coaster of emotions, waiting for me to come back to Earth.  When I did, we did what any other couple would do - we made a list.  A huge list.  A list of all the little tiny 10 minute projects around our house that we've been procrastinating for far too long and the larger projects that we hoped we could get done before they arrived.

Here's a link to the article if you're interested:

I'm guessing I can safely say that most of us take on home improvement projects and only finish them somewhere between 80 - 95%.  A few tiny details always seem to linger and even though they would take mere minutes to finish, it can be hard to find the motivation to come back around and finish them once you've moved onto something new.  Sometimes you need motivation, like the local media, to kick your buns into gear and finish what you started.

You are about to witness what the Kruse's can accomplish when mama hits DEFCON 1!

The kitchen paint color was ok, but the color in the dining room was just a few shades off, so I felt like it would feel more cohesive to carry the dining room/living room paint color through to the kitchen.  Plus I thought the new paint color would flatter our kitchen cabinetry more than the old color, which seemed to make the cabinets feel a little yellow.  Project time: 3 hours

Before                                                                                            


After


Before


After


In our basement bath that we remodeled over a year ago, Brent was never able to get around to building the cabinet doors and drawer fronts.  Which is super ironic because his full time job is building cabinet doors.  Project time: 8 hours


Last summer, my neighbor, the same one that gave us our shed, gave me the back door off of his house because he was putting a new one on.  I spent several weeks stripping it (the running joke became "Heidi is stripping in the driveway") and sanding it so Brent could replace our current front door with it.  Since our old front door was a left swing and needed to be a right swing, we were left with these holes in the jam from the old hinges.  Brent filled the holes with wood filler and sanded and painted them.  Project time: 1 hour


French doors lead from our dining room to the outdoor patio.  A few months ago we replaced the handle set because the old one wasn't latching properly.  I never got around to touching up the paint where the old lockset was.  While I had the trim paint out, I went around the main floor and touched up all the trim that had nicks dents and scratches in it as well.  Project time: 30 minutes


All of these projects took us a Saturday to complete.  We spent Sunday through Tuesday going through every room, decluttering and deep cleaning.  When I say "deep cleaning", I do not mean that lightly.  Fan blades were dusted, folks, and the tops of doorways and picture frames.  That's a first for me.  So is ironing a tablecloth and embarrassing to admit - but I even ironed our Christmas stockings.  Everyday I iron my clothing, but a tablecloth and Christmas stockings?  Seriously?  They were super wrinkly and I wanted it to look perfect though, so sometimes we do thinks out of the ordinary to achieve the almost extraordinary.  I probably should have been a home stager.  When you spend as much time as I do, looking at pictures of homes and ideas for projects, you start to get a sense for how things need to look to translate to good pictures.

Even though these projects weren't incredibly gratifying, it felt good to cross them off the list.  What projects have you been procrastinating?

Friday, November 15, 2013

House Tour - Basement Family Room/Bath

16,000 woodworking plans inside...(2 days left) 

I just discovered this and suggest you see this immediately... 

BHC 14 INEXPENSIVE TREE STAND PDF Plans build your own tree stand Woodworking Download.
Click Here To Download

When we bought our house, the basement had a small family room, a bedroom and a bathroom.  Rarely would we spend time down there because there just wasn't enough room for us to watch tv and have room for Emma and Owen to play at the same time.  A large bedroom took up about half of the useable space, which we thought would be nice to have.  But after living here for a year, we realized that we had only ever stepped foot in that bedroom about 3 times.  Mostly we were just using it to pile up stuff we didn't have a use for anymore.  Knowing the bedroom needed to come out, we began planning for a brand new basement.

I will walk you through the changes as we move through the photos - a lot of them!  It took us about a year to remodel the basement for a few reasons.  First and most importantly, we wanted to pay for everything as we went, so sometimes we would have to break for a little while so we could save up more dollah's!  Second, there are a lot of small details that go into doing a project of this size correctly.  We wanted to do it right the first time so we wouldn't have to come back and fix something.  Third, Owen was only about a year old and Emma was only about 3.  Either Brent or I had to be on child duty, which only left one person to work.  

The old stairs were carpeted, which we actually really liked - but since our garage is at the top of the stairs and we seem to make lots and lots of trips from the garage to the basement, the stairs get dirty...fast.  Carpet would never hold up for us.  These were pine treads (which are surprisingly cheap) stained the same color as the rest of our woodwork.  Pine is sort of soft so it is more prone to scratches and knicks.  There is a little wear visible on them but since our house is so old, brand new wasn't exactly what we were going for.  Rustic would be more appropriate.


This is the landing at the base of the stairs.  The door on the left is a walk in pantry closet for my bake ware that isn't used on a regular basis - like my stand mixer, serving ware and cake decorations.  The door straight ahead goes to our laundry room, storage area and furnace/water heater stuff.


This is what the pantry closet looks like.


Here's the view when you walk into the family room from the stairs.  The walls are reading a little green in this photo - blame it on my cheap camera.  The above photo of the stair landing is a more accurate depiction of the color.


We bought the desk and board game shelf from World Market when we lived in Omaha.


This small area where the game table sits is the old family room.  Told you it was small!  Now we use this space to play board games, eat our ice cream and work on art projects.  Emma sits here probably 3 nights a week to color.


The blue board hanging on the wall is a magnetic board.  We painted a piece of plywood with a few coats of magnetic paint and then a coat of the color of our choice.


On the opposite wall is a dry erase board - every kid loves a dry erase board, right!?  Both of these boards were Christmas gifts we made for the kids last year.


This amazing light fixture came from Lowe's.  When we found this light fixture we both immediately became smitten with it.  So much so, that we had to figure out a way to use it in the room.  It was kind of the inspiration for creating the game area over on this side of the room.  A good light fixture will make you do crazy things!


Brent is a HUGE Iowa Hawkeye football fan but I was leery of incorporating a bunch of that stuff down here because it's always so bright and gaudy.  On a shopping trip to the mall one day, I happened to be browsing the calendar kiosk.  A vintage Iowa Hawkeye program calendar practically jumped into my hands - the colors were toned down and it was more about the history vs the logos.  After tearing out the posters, I clamped them into wooded hangers from Target.  Frames would have been WAAAAYYY too expensive, this seemed like an easier and cheaper alternative.


If you can put your imagination cap on for a second, this whole back area used to be a bedroom.  The recessed area where the tv is hanging used to be a closet.


We used some dark chocolate colored paint left over from Owen's bedroom to paint the recessed areas of the entertainment center.  When the tv is off, it makes the tv blend in with the wall so it isn't screaming at you "LOOK HOW BIG I AM!"  Yeah, I know, it's a big tv...60".  I wasn't even confident it was going to work in this small area.  When we were deep in the throws of construction, Brent and I would sit in folding chairs where the couch currently is, with a piece of cardboard taped on the opposite wall, attempting to visualize what size tv to purchase.  I'm glad Brent convinced me to go with the 60", when we actually get a few minutes to watch tv, it feels like our own little private theatre, but more cozy.


We passed on the matching ottoman that was available with the sofa and went with a contrasting storage ottoman we found at World Market for $60.  It works a little better in our compact space.


Brent added this built in bookshelf to give us some additional book storage.  The crates on the bottom shelf came from Target and happened to match all of our other wood work perfectly.  We tried to do as many things as we could to make this a great play space for the kids.  Easy access to their toys and books and a big open area to spread out in.  


Our movies are stored in this drawer - for us, the less visual clutter the better.


There was always a bathroom down here, we just updated it.  The pocket door was added so we wouldn't have to worry about a swinging door in such a small space.


The same tile and paint that we used out in the family room was carried into the bathroom.  We believe consistency in finishes is important in small houses.

Brent built this vanity.  By himself.  I still really can't believe he knows how to do that.  He also made the solid surface countertop with the flush mount sink.  The mirror is from the Habitat Re-Store and he built a frame to go around it.


You can see a few more of the calendar posters in the black frames in the mirror.


Yep, you're seeing that correctly.  A walk in shower.  This is actually a fantastic asset for our kids.  I have them take a shower every morning instead of a typical nightly bath because Emma's hair must be washed in the morning as it is super curly.  They march in there, get wet and then come and stand by the entrance of the shower so I can shampoo/condition them.  They get wet, I don't.  It's a perfect scenario!

The shower floor is the one thing we've had trouble with.  Apparently when we tiled the shower floor, we should have left an expansion joint between the tiles laid against the walls to allow for expansion and contraction.  Since we didn't, when the wall studs naturally expanded, it pushed the tile inward and it caused them to heave.  Some of the flooring will need to be removed and re tiled to correct it.  That's a project for another day though.


For the border in the shower, we cut apart tiny strips of the same tile we had used on the floor to create that tiny ribbon around the top and bottom of the border.  When figuring out what kind of shower head to use, we decided we wanted a removable shower head.  It would make it much easier to spray off the walls when cleaning them and for hosing off the children.  When we had a dog, it also made it easy to give her a bath.


 Hanging above the desk, Brent also built this cork board for us to hang the kids art work on.


I found this clock at Gordmans but instead of hanging it with the little bracket on the back, we mounted an antique hook to the wall and hung the clock from it.


Oh yeah, and this is a little built in Brent built to hang our family picture in.


So it was worth the year long wait, we got exactly what we wanted.  I think we all just kind of take in a deep cleansing breath when we have a few precious minutes to spend down here together, as a family.  The kids' favorite thing to do is to snuggle up with us to watch a family movie, have a little popcorn and some candy.  Even though its been two years since completion, we still can't believe this is our basement.  A lot of long nights were spent down here, burning the midnight oil to get it done.  

To see earlier parts of the house tour that you might have missed, here are some quick links:

1930's Cottage Bathroom Remodel

16,000 woodworking plans inside...(2 days left)  I just discovered this and suggest you see this immediately...  BHC 14 INEXPENSIVE...